
Unity5.6.0で追加されたTest RunnerのPlayModeを使ってみた
- 2017.04.11
- Unity
こんにちは。大阪スタジオ エンジニアの西村です。
Unity 5.6.0からTest RunnerにPlayModeが追加されました。以前からあったEditModeのテストではカバーできなかったフレームをまたぐ非同期処理などのテストが可能になります。ざっくり試してみた結果をまとめてみました。この記事ではUnity 5.6.0f3を使用しています。
PlayModeを有効にする
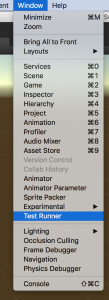
初期状態ではPlayModeが無効になっているので有効にします。まずWindow – Test RunnerでTest Runnerウィンドウを開きます。
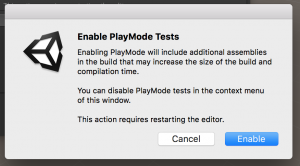
PlayModeタブを選択すると”Enable playmode tests”というボタンがあり、これを押した後でUnityを再起動する必要があります。


これでPlayModeが使えるようになりました。
PlayModeでテストを実行してみる
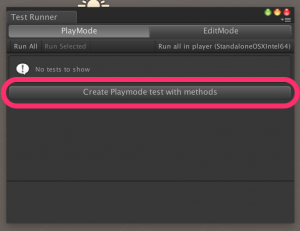
Create Playmode test with methodsを押すとテンプレートスクリプトが作成されます。
NewPlayModeTest.cs
using UnityEngine;
using UnityEngine.TestTools;
using NUnit.Framework;
using System.Collections;

public class NewPlayModeTest {

    [Test]
    public void NewPlayModeTestSimplePasses() {
        // Use the Assert class to test conditions.
    }

    // A UnityTest behaves like a coroutine in PlayMode
    // and allows you to yield null to skip a frame in EditMode
    [UnityTest]
    public IEnumerator NewPlayModeTestWithEnumeratorPasses() {
        // Use the Assert class to test conditions.
        // yield to skip a frame
        yield return null;
    }
}
スクリプトがコンパイルされるとPlayModeにテストが追加されます。
とりあえず手を加えずにRun Allしてみると。シーンがテスト用のものに入れ替わりUnityがPlay状態になります。しばらく待つとテストが実行され結果がTest Runnerウィンドウに反映されます。
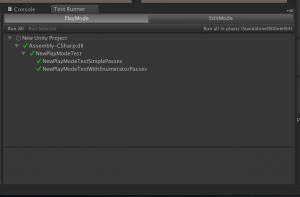
当然なにもないので成功です。
次は失敗させてみましょう。適当にAssertを追加します。EditModeのテストと同じ感覚で書くことができます。
NewPlayModeTest.cs
using UnityEngine;
using UnityEngine.TestTools;
using NUnit.Framework;
using System.Collections;

public class NewPlayModeTest {

    [Test]
    public void NewPlayModeTestSimplePasses() {
        // Use the Assert class to test conditions.
        Assert.IsTrue(false, "失敗させてみる");
    }

    // A UnityTest behaves like a coroutine in PlayMode
    // and allows you to yield null to skip a frame in EditMode
    [UnityTest]
    public IEnumerator NewPlayModeTestWithEnumeratorPasses() {
        // Use the Assert class to test conditions.
        // yield to skip a frame
        Assert.IsTrue(false, "失敗させてみる");
        yield return null;
    }
}

はい、失敗しました。
PlayModeらしいテスト
ここまではEditModeでも実行できる内容です。次にEditModeでは出来なかったフレームの更新がある状態になっているか試してみます。
NewPlayModeTest.cs
using UnityEngine;
using UnityEngine.TestTools;
using NUnit.Framework;
using System.Collections;

public class NewPlayModeTest {

    [Test]
    public void NewPlayModeTestSimplePasses() {
        // Use the Assert class to test conditions.
    }

    // A UnityTest behaves like a coroutine in PlayMode
    // and allows you to yield null to skip a frame in EditMode
    [UnityTest]
    public IEnumerator NewPlayModeTestWithEnumeratorPasses() {
        // Use the Assert class to test conditions.
        // yield to skip a frame
        yield return null;
    }

    [UnityTest]
    public IEnumerator 複数フレームに渡ってテストできる() {
        // Time.timeは同一フレーム中は同じ値を返す
        var startTime = Time.time;
        System.Threading.Thread.Sleep(1000);
        Assert.AreEqual(startTime, Time.time);

        yield return new WaitForSeconds(1f);

        // フレームが変わっていればTime.timeの値が変わっているはず
        Assert.AreNotEqual(startTime, Time.time);
        yield return null;
    }
}
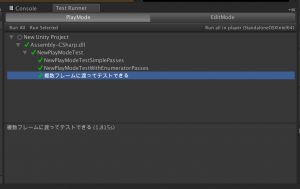
複数フレームに渡ってテストできることがわかります。
MonoBehaviourTest
MonoBehaviourTestと言うものがありますが詳しい使い方がわかりませんでした。動作テストに使用したコードは以下の通り。
ExampleBehaviour.cs
using System.Collections;
using System.Collections.Generic;
using UnityEngine;

public class ExampleBehaviour : MonoBehaviour {
    protected int counter = 0;

    // Use this for initialization
    void Start () {

    }

    // Update is called once per frame
    protected void Update () {
        counter++;
    }
}
ExampleBehaviourTest.cs
using System.Collections;
using System.Collections.Generic;
using UnityEngine;
using UnityEngine.TestTools;

public class ExampleBehaviourTest : ExampleBehaviour, IMonoBehaviourTest {
    public bool IsTestFinished { get; private set; }

    // Update is called once per frame
    new void Update () {
        base.Update();
        Debug.Log(counter);
        if (counter > 10)
        {
            // ここで止めておかないと他のテストの裏でも動き続ける
            gameObject.SetActive(false);
            IsTestFinished = true;
        }
    }
}
NewPlayModeTest.cs
using UnityEngine;
using UnityEngine.TestTools;
using NUnit.Framework;
using System.Collections;

public class NewPlayModeTest {

    [Test]
    public void NewPlayModeTestSimplePasses() {
        // Use the Assert class to test conditions.
    }

    // A UnityTest behaves like a coroutine in PlayMode
    // and allows you to yield null to skip a frame in EditMode
    [UnityTest]
    public IEnumerator NewPlayModeTestWithEnumeratorPasses() {
        // Use the Assert class to test conditions.
        // yield to skip a frame
        yield return null;
    }

    [UnityTest]
    public IEnumerator 複数フレームに渡ってテストできる() {
        // Time.timeは同一フレーム中は同じ値を返す
        var startTime = Time.time;
        System.Threading.Thread.Sleep(1000);
        Assert.AreEqual(startTime, Time.time);

        yield return new WaitForSeconds(1f);

        // フレームが変わっていればTime.timeの値が変わっているはず
        Assert.AreNotEqual(startTime, Time.time);
        yield return null;
    }

    [UnityTest]
    public IEnumerator MonoBehaviourのテスト() {
        yield return new MonoBehaviourTest<ExampleBehaviourTest>();
    }
}
MonoBehaviourTestを利用してMonoBehaviourを実行することも可能です。IMonoBehaviourTestを実装したMonoBehaviourがIsTestFinishedがtrueを返すことでテストが完了します。IsTestFinishedがfalseのまま30秒経過するとタイムアウトしますが、タイムアウトしても完了として扱われてしまいます。
MonoBehaviourTest実行中にAssertを呼び出してしまうと以後のテストが失敗してしまうため、Assertを呼び出すことでテスト単体を失敗させる事ができません。MonoBehaviourTestについてはそもそも使い方を間違えている可能性もあるので深追いしないことにしました。
Playerでテスト
左上のRun AllではUnity Editor上のPlayモードで実行されますが実際のPlayer上でも実行することが出来ます。
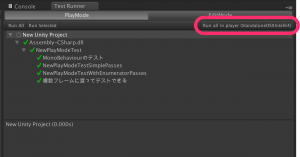
Build SettingsのSwitch PlatformでAndroidに切り替えてみると、右上のボタンがRun all in player(Android)に変わります。
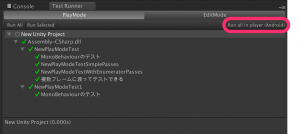
実行してみるとビルドが走りAndroid端末でテストが実行されます。実行結果がUnity上のTestRunnerにフィードバックされないのは残念ですが手軽に実行することが出来ます。

まとめ
今回調べた中で分からなかった事
- UnityEngine.TestTools.MonoBehaviourTestの扱い方
- コマンドラインからPlayModeのテストを実行する方法
MonoBehaviourTestの扱い方が分からなかったため不完全燃焼ではありますが、PlayModeを利用することで今まで出来なかった非同期処理のテストも書くことが出来るようになりました。また、コマンドラインからの実行が出来ないのでCIに組み込む事が出来ませんが、コードレビュー時など手元でサクッと実行できるのは便利です。
今後もPlayModeテストをCIに組み込むことを視野に入れてウォッチを続けていきます。
-
前の記事
GCE Local SSD向けのチューニング 2017.04.05
-
次の記事

入社2週間の新卒エンジニアが紹介するAimingの新人研修 2017.04.18